Showing posts with label featuring eNVe Designs. Show all posts

11.17.2015

eNVe 6x6 :: Sandy of Sandy a la Mode


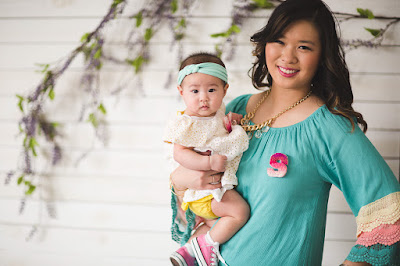
Next up on my eNVe 6x6 Style Series is Sandy. I met Sandy several years ago when she contacted me and invited me to my first ever blog meet up, before there was a KC Blogger Meetup (now The Blog Guild). Not sure how she found my blog, but I'm so grateful she did! So much has happened since that time (like she had 2 babies! and moved half way across the country), but one consistent factor was that she was always super stylish and effortlessly so. You'll see for yourself.  ;)  She chose to style a one-of-a-kind eNVe matte gold statement necklace with faceted quartz nuggets.


>>> Tell us a little about you and your blog.

Hello! My name is Sandy and I am the blogger behind Sandy a la Mode! My blog is primarily a women and kid's fashion blog with features on DIYs, home decor, recipes, and lifestyle too.


>>> How would you describe your style in one sentence?
Colorful


>>> Being a busy mom of 2 little ones, working full time, and blogging full time, how do you manage to balance it all and keep fashion at the forefront of daily life?
Yes, I am very busy, but we all need to get dressed every day right? I just pay a little more attention to fashion trends and outfit pairings, maybe more than the normal person, but it's something I enjoy!


>>> What is your favorite item of all time from your wardrobe and why?
Wow that is a tough one. But I would say my favorite items are tulle skirts because they are just so beautiful and fun. But my most worn items are probably every day dresses or distressed skinny jeans!


>>> What trends are you looking forward to this fall/winter season?
I think a big trend will be black and white!  It's nothing too crazy, but it's definitely a classic. I know that I said my style is colorful, but I actually love doing outfits that are all neutrals with a pop of color!


 >>> Do you have any predictions for Spring Summer 2016 trends? Anything you hope will make a big comeback?

I think muted gray or blush pink colors will be big next Spring/Summer... at least I hope they are since I think both are beautiful colors that can act as neutrals too!


Thanks so much for sharing your style with us, Sandy!  

Now that seasons are changing, what are your fall/winter wardrobe staples for this year?  For me, it is breaking out the booties and boots....forever and ever, it's the staple I look forward to wearing every fall.  

Stay toasty, everyone!


6.25.2015

eNVe 6x6 Style Series


One of the most fun and rewarding things about being a designer is seeing your creations out and about in the real world, integrated into people's lives. I'm sure all artists could attest to this! So I have teamed up with six of my favorite style bloggers to bring you this new series I'm calling "eNVe 6 by 6".  Each blogger will each style one eNVe Designs piece in six different looks. I'm super excited to see how these ladies will incorporate their piece into their already fabulous wardrobes! Pictured above are the first looks from each blogger. I'll be individually featuring each of these ladies and their blogs in the next couple months and you'll be able to see just how creative they are with their outfit choices! I already know...that's why I personally selected them!  ;)  If you're not already following their blogs, I hope you'll stop by and visit.  While you're there, tell them I said hello. :)

Sandy // Sandy A La Mode
Megan // Chasing Davies
Lisa // Peridot Skys
Lashonda // Fashion Plate KC
Shea // Shea Lennon


And if you're ever wearing eNVe Designs, I'd love to see it! Just tag me @eNVeDesigns and #eNVeDesigns on twitter and/or instagram or share to my facebook page. Who knows, you may be selected to participate in my next 6x6 series! :)


6.17.2011

Why I've Been Missing...

eNVe Design's first local boutique appearance!

My apologies for being invisible lately.  I've been extra busy the past couple months with an assortment of things on my plate, some of which was making lots of new jewelry for three shows, and brainstorming/building my display for Runways, a brand new collaborative boutique in Leawood, KS.  If you're in the Kansas City area, you can now shop eNVe in person!  And speaking of shopping, the Runways Grand Opening Event is tomorrow night!  10% of sales all day tomorrow and 100% of ticket sales to the Grand Opening Party tomorrow night will be donated to the Young Survivors Coalition of Kansas City.  If you're in the neighborhood, stop by.  I guarantee you'll have a blast!

So back to the display.  I didn't anticipate it, but putting together this display was time intensive!!!  There were many late nights, many moments of trial and error, many hours searching for the right tables (at yard sales, estate sales, furniture stores, etc.), and many hours at home depot.  Thank the high heavens for my amazing husband for taking my crazy idea and actually making it happen!

It all began with the idea that I wanted a wall of floating frames where I'd be able to display the necklaces and earrings.  I wanted the look of it to be consistent with my art show booth, with  mismatched but cohesive frames.  But I only had a 4x5 space to work with so we needed to build up to utilize the vertical space.  I didn't know the logistics of how this floating frame wall would happen so I enlisted my engineer husband for that part of the job.

Here's a peek at part of the process, from start to finish.  I originally intended to do a tutorial, but then things got so hectic and I didn't get a chance to take more pictures during the construction.  We just had to crank it out.  So if you really want to know all the materials and supplies we used, and what we did exactly, just email me and I can share that with you.  :) 

This was our first garage sale find.  It was perfect.. solid wood, good for refinishing, small enough to fit in the allotted display space, and it had these cool brass connector pieces (a tiny detail, but I am a big fan of detail).


With limited time, we couldn't sand the whole thing down for repainting, so instead, we went with "liquid sander", which cleans and deglosses the surface all at once, making it ready for paint as soon as it was dry.


 I went with the color palette used in the boutique so the display would have a cohesive look that complements the boutique decor.  I also wanted an "industrial chic" look and knew I wanted my tables to look a little distressed.  The three colors I used were a light grey, avocado green, and dark grey.  I painted the entire table the light grey, then once dried, painted a few sections green (the areas I would be distressing later).


Once all that was dry, I went over the entire table with the dark grey.  I wasn't sure what to do about the brass pieces, but ended up painting over them as well.  Then once the paint dried, I took some sand paper and went to town.  I sanded down most of the surface lightly, then used a little more elbow grease on select spots so that the green and light grey could show through.  I've actually never painted any kind of furniture before so this was a first for me.  I'm not even sure how it's supposed to be done, but I am really really pleased with how it turned out!


This first table was originally the one that was supposed to hold up the frame wall, but the more we thought about the structure of the floating frames, we decided it wouldn't be sturdy enough for it.  So after searching endlessly for the right table and not finding anything that I felt would work, my husband ended up building one for me!  All I wanted was a 3x4 table top and some sturdy legs.  It's crazy that I couldn't find anything like that anywhere, especially anything made of solid wood rather than particle board!  My husband definitely came to the rescue.   :)


Here's the table top (upside down) with a coat of primer on it.  Next are the legs and the frames, primed and ready for paint.


Rather than doing the 3 layers of paint (light grey/green/dark grey), I just painted the backs of the frames dark grey because I wasn't going to distress it at all.  I also skipped the light grey on the table (because the primer was white and pretty close to the light grey color) and painted the whole thing green, then dark grey.  Same thing for the legs.  Those got spots of green, then covered with dark grey.


Here are the frames (front side) in the arrangement that I wanted.  Hubs built a vertical wooden support structure in the shape of this arrangement (which I didn't get a pic of) and attached each frame to the structure (much easier said than done).  Prior to attaching each frame to the support structure, hooks or wire mesh were added to the frames for hanging jewelry.  I also had a custom mirror cut to put inside the large green frame.  Can't sell jewelry without a mirror.  :)


And here's a close up shot of the finished table.  The legs were bolted on with large bolts, to enhance the "industrial" look of it.  I distressed it the same way I did the smaller table and was pleasantly surprised by how the natural wood grains showed through!  I really want to repeat this project with some furniture for our home because I had so much fun with painting and sanding it down.  I just have to find the perfect furniture... and some time!


And here I am, placing my jewelry onto the finished display in the boutique.  Done, Voila!


Here's the back view of the display.  The small table was the perfect size for the all the accent display pieces I found.  I need to figure out what to do about that black area (the backside of the mirror).  I could either do a large product photo, or adhere some sort of decorative paper/fabric to it and add more hooks to the top of the frame to hang more necklaces... or???  If you have any ideas or suggestions, please please please share!  I hate that it's just a blank black space.


Here are some more views of the display.  Some earrings.....


The centerpiece -- my Signature Wrap and Thread Necklaces..........


And some delicate sterling and gemstone necklaces.


I'm really thrilled at how the whole project turned out!  I'm also happy that it's complete because while it was fun to brainstorm and build this display, it was definitely not conducive to adequate sleep.  

What fun projects have you been working on lately?


11.14.2010

Demystifying the eNVe Wrap and Thread Necklace

 
You know, sometimes I get so wrapped up in my own brain that I forget that others may not share my perspective or view things with my personal frame of reference.  My Wrap and Thread necklace design is a fitting example of this.  While doing my first shows the past couple months and getting to meet customers in person, I was really surprised by how many intrigued and perplexed looks I saw on people while they browsed my Wrap and Thread necklaces.

 
Frequent questions included, "so what is this?"... "how does this work?"... "where's the clasp?"... "how do I close the necklace?".  It did help when I displayed photos of various necklaces worn several different ways along with a brief written description, but more often than not, I was asked to demonstrate how to create the different looks, like the styles below.


[For those of you reading this who are not familiar with my Wrap and Thread Necklace design, it's a long, open-ended strand of gems and chain interspersed with at least one link along the strand.  There's no closing clasp so you wear it by wrapping it around or doubling it up, and threading the end through the link, which you place in front (like a lariat necklace).  My original Wrap and Thread designs included one or two links, but have now evolved to include designs with up to 5 links, some with handmade toggle-like closures, as well as double-stranded styles.  The more links there are in the necklace, the more styles you can create.]  

I'm really happy that everyone spoke up because it was definitely a lot of fun getting to share with folks how this design came to be and showing them how super simple it really is to change up the looks!  And if people didn't ask me, I wouldn't have had this realization.  Even after my demo and explanation, some people joked that they would still need a written tutorial to remember how to wear it.  It never really occurred to me to write a tutorial because it isn't a complicated design, and I thought having a few photos of the different ways to wear it would be explanatory enough.  But after those shows, I had an epiphany.  Wearing this necklace is intuitive to me, but that's because it's my brain child and I've been experimenting with it for years!  Since the inception of this idea about 5 years ago, it's been in my mind and on paper in so many different iterations.  And I've thought about it so much, have done so many revisions on the design, and have taken hundreds of photos of all my different Wrap and Thread necklaces that creating the various looks with one necklace is second nature for me.  Obviously, this may not be the case for most people browsing my jewelry.  Sorry for the momentary lapse of clarity, everyone.  I'm happy to announce that I finally got a clue.  :)

So for the next few installments on my blog, I'll highlight the different Wrap and Thread styles I've come up with so far, and maybe include with each post a tutorial on how to create several key looks.  Do you think a tutorial would be helpful at all?  I'd love to hear your opinions on this!


7.13.2009

The fruition of a vision :: Aspiring Couture


Introducing a new online boutique: Aspiring Couture

Several months ago, I was approached by Allison O'Grady, founder of Aspiring Couture. She was recruiting emerging designers for her new venture and wanted to include my work. It's one thing (a very critical thing, I might add) to believe in your own vision, but to have someone else recognize and believe in your work is truly something else... something equally important in this vast entrepreneurial world, where it's quite easy to feel minuscule and irrelevant. I definitely consider myself a newbie in this little jewelry design venture of mine, but an "emerging" or "up and coming" designer was not a part of my self-descriptive vocabulary. To me, I am just creating jewelry pieces that I personally love and would personally wear, and I adore working with gorgeous natural materials and other interesting finds. That was the extent of it in my book. It's just delicious icing on the cake when others enjoy my work as well. And of course I hopped aboard the Aspiring Couture ship, not simply because I know it's headed for great places, but because I believe in Allison's wonderful vision as well. I'll let her express it in her own words:

"I'm Allison O'Grady, creator of Aspiring Couture, with a strong purpose to help passionate designers and showcase their work for those people who are looking for something different!

I started Aspiring Couture because I want to encourage other designers to continue to create on their dreams. I have grown up in a hard working and creative environment with the belief that helping others achieve their goals is an important part of one's life. You can't get anywhere alone, so it is important to help and support other people on your journey to succeed.

I am still learning so much, but I do want to thank those who have helped and supported me thus far. I look forward to the rapid expansion of Aspiring Couture which in turn means the rapid expansion of aspiring designers."

And what is Aspiring Couture?

"Aspiring Couture is an online boutique and fashion blog featuring the original work of aspiring designers. The purpose of Aspiring Couture is two-fold; first it is to help these truly amazing designers flourish and prosper, second, it is for those who are searching for something different and original to perfectly communicate their personal style.

Aspiring Couture was created for those people who are searching for something different. Aspiring Couture features only the work of aspiring designers in an effort to give you something new and original to wear! On the other side, you can feel good knowing that you have supported those designers who have worked so hard to create something to fit your personal style."

I can't express how great of a fit it is for eNVe Designs to be a part of Aspiring Couture's overall mission. I'm a huge proponent of letting your individuality shine and work really hard to create pieces that would allow for optimal versatility to reflect the wearer's unique and multi-faceted styles. I take great pride in this because it's my heart and soul, but never truly know how well this passion extends into the real world. That's why it's such a thrill and an honor to have such encouragement. Thank you, Allison. Truly.

I am currently working on some limited edition pieces that will only be available exclusively on Aspiring Couture, so keep your eyes peeled!

3.23.2009

eNVe Designs GIVEAWAY :: on Lillyella's blog


Nicole of Lillyella has kindly spotlighted me on her incredible blog! Please stop by and check out my spotlight feature. You can also enter to win earrings of your choice from my eNVe Designs etsy shop!

1.06.2009

eNVe GIVEAWAY on Boston Mamas

Enchanting


Honeymoon


Hey everyone! Didn't want any of my wonderful readers to miss out on this. One of my Signature eNVe Designs necklaces is up for grabs on www.bostonmamas.com. All you have to do is post a comment and you could win either my Enchanting necklace ($231 value) or Honeymoon necklace ($95 value)! Don't miss it! See their "Necklace Envy" post.

Oh, and you only have 2 days! The giveaway closes on 1/08!!!

10.28.2008

eNVe Designs on DJ Neekola!


"Clarity", one of my wrap and thread necklaces was featured in a photo shoot with DJ Neekola! She's an international dj who tours Europe and South America. This totally made my day!!!

{credits: model is DJ Neekola; photography by Tim Coburn; hair and makeup by James Cornwell; Wardrobe by Aidah Collection; jewelry by eNVe Designs}